Pages

Subscribe:

Ads 468x60px

Monday, September 24, 2012

Here's To Busy Weekends...and Our New Picnic Table!

Happy Monday everyone!

How was your weekend?  My was SUPER busy, but it was beautiful outside and I was with my family.  You can't beat that!  We did a bunch of stuff in our backyard (2.5 tons of mulch, adding lattice to our deck, staking pavers, planting mums...) and my husband built us a picnic table!

We have a patio table on our deck, but we needed something that's a bit smaller that our boys can sit at, and that gives us more seating and a place to put stuff that's close to our fire pit (directions on how to build one coming soon).

I printed this out from a Google Images search (find the picture here) and we went to buy the lumber.  Seriously-he's one of those guys that can take a picture, and make it into this:
Checking for fit for the boys before securing the bench seats.  
(and Jacob is coloring on the table with a pencil.)

But for $45.00 and a little less than an hour, we have a solid (for real-it's about 150 pounds) picnic table!  During the Summer, I've seen these at Lowe's for over $100.00, so it's definitely worth it to make it yourself, if you're interested!

However, unless you're a carpentry genius like my husband, I'd spend some time on Google looking for free plans-they're EVERYWHERE.

I'm going to paint (Robbie is cringing-he's offended by any finish other than stain on wood) the table a bright blue color...just 'cuz!  I'll post pictures soon!

Happy Monday again, and I hope you have a great week!  If you have any questions about the picnic table project, leave me a comment and I'll ask Robbie and get back to you!

Tuesday, September 11, 2012

Layout: Trick or Treat 2011

The weather was so nice this weekend-which is a big deal in North Carolina (it's not unusual to be in the 90's going into October).  So I thought I'd celebrate by scrapping a Fall-time layout!  Halloween 2011 ya'll!  Be warned: my boys are absolutely adorable in the upcoming pictures...just fair warning.  :)

I've tried keeping up with all the brands I use while scrapbooking so I can write them up with my posts (see here and here and here) but truly, it's darn-near-impossible.  It's just not how I scrapbook; I use lots of bits and pieces from my stash-really whatever I think looks good together.  But if there's something you see, and you'd like to know where it came from, leave me a comment, and I'll do my best to find out!
AHH!!  I could just squish my little Jacob (bottom photo)  SO flippin' cute!  But here's the whole layout: I loved the green and purple background; I thought it was a nice alternative to all the orange that's usually on Halloween pages (not that I didn't make up for the orange later, but it's not so over-powering)

 Little spiders with googly eyes?  Can't go wrong.  I used black and white baker's twine for their strings instead of plain black-I thought it was a little more eclectic...kind of in that whole Halloween vibe.
LOVE the picture of Liam walking with his daddy up the street...I thought this side of the layout needed a little something to balance out the text on the right, so I punched a circle and used some Halloween-y words.  It brought the balance of text plus some more color.

So that's it; definitely getting into the Fall spirit!  Ready for s'mores (who am I kidding-I make those year-round), a nip in the air and jeans!  How about you?  Ready for the cooler weather and holidays on the horizon?

Monday, September 10, 2012

Yay! for Friends (and Crafty-ness!)

Happy Monday everyone!  (I'm not really 'happy' for Monday but give me credit for trying to start off a Monday on a positive note...)

Anyhoo-a couple weekends ago I went to a glass fusion/inclusion/slumping class (all technical terms that I'm doing my best to remember from what our instructor said) with my bestie Amanda (check out the Teacher Appreciation 'Cake' we made here).  We bought seats in the class through Groupon and had a fanTAStic time!

Those are our shards of colored and clear glass in the bottom right-hand corner!
follow me on Instagram: l_jsmommy

So Amanda got her glass bowls back last week, and they look so awesome, I can't wait to get mine back!!!  Fingers crossed for this week!


I can't chose which is my favorite...I'm partial to greens, blues and purples, but I love the colorful confetti one...what do ya'll think?

Wednesday, August 22, 2012

DIY Photo Gallery Wall


A few weeks ago, Robbie and I visited IKEA for the first time.  I have wanted to visit an IKEA since I learned all about their awesome-ness...it just took me about 6 years to get there.  But I went, and it was AMAZING.  If you’ve never gone, I highly recommend it!  It was just absolutely amazing!  I can’t think of a better word to describe it!  Now, over the span of 6 years, I’d been formulating lots of home projects that required a trip to IKEA.

This one is for a photo gallery wall.  This project was a more recent addition to my mental list...it showed up about the time my boys did (go figure!).  Anyhoo, this is a really fun project, and by getting the frames at IKEA, it’s an affordable project as well.

So here’s how we did it:

From IKEA, we bought a collection of frames from the Ribba, Nyttja, Sӧndrum and Virserum lines.  I knew that I wanted an eclectic mixture of sizes and depths, but needed some way to organize the lines with a cohesive, linear feel, so we used a 1.5” thick ‘border’ through the middle of the gallery.  So the bottoms of the frames on the top row were against the same invisible line, and the tops of the bottom row frames  were against an invisible line.  (This sentence is where a picture really is worth a thousand words-see below)   I also had the frames end at the same points on the right and left.  

I had measured our living room wall before we left, and knew we had about 8’ of space to work with.  We laid out all the frames we wanted on the floor of IKEA, in a rough mock up to make sure we had enough to balance the top on bottom rows.  Nobody even blinked an eye at IKEA-did I mention it’s awesome?!

The most time-consuming part of this project was figuring out which 16 photos I wanted to use (it was a long process...days even...).

I did another layout, more specifically this time, on our bedroom floor, and took a picture, so I could line them back up in the right order in the living room.


So here’s my major tip for this gallery wall: use Command Adhesive Velcro strips!  Can you imagine the number of holes you’d put in your wall to hand all of these?  It’s too many to contemplate!  I came across this tip a few weeks ago when I needed to hang a super-skinny piece of canvas board in my son’s room.  My sister painted him a (Pinterest-inspired) really cute whale picture, but there was no way to hang it traditionally, with a nail/screw and anchor.  So Command Adhesive Velcro it was.  The instructions are on the box, but it’s a super-simple, peel and stick application.


It's really important, before you stick you first frame to the wall, that you use a level!  Once you have the first frame hung and it's precisely (or as humanly possible) level, then you can level the next frames off of that one.  There's nothing worse than getting everything hung up, then sitting down to admire your work and you realize it's crooked.  That would not be good.


So here’s the final layout; I ended up adding a few white frames that were on sale at Target, just to make it a little longer...I think I’m going to try and find a 3-picture-opening frame (like the one on top) to go underneath the last 3 frames on the bottom row (left-hand side).  I think it needs that little something right there.

(sorry for the glare...I tried taking this picture in the morning, mid-day and at night, but there was always a glare...the glare from the ceiling fan was the least offensive!)

Anyhoo-thanks for stopping by and come back soon!  (and if you’ve never gone to IKEA, plan a trip...you won’t be sorry!)

Monday, August 20, 2012

Project Life 2013: Seafoam Edition

YAY!  I have my Project Life Edition picked out for next year: Seafoam!  Becky Higgins shared a sneak peek on her blog today, and I. Am. So. Excited!  I love everything about the Seafoam Edition!  Nice and modern, lots of blues, grays and oranges, chevrons, polka dots, lines...I love it!

Everyday this week she's sharing a new release, but truly, I don't even need to see the 2nd Edition (though I'm sure it will be lovely), because I am totally ready to get my hands on Seafoam!  Just from what I've seen, it's going to work perfectly for me and my house of boys.

So that's it; just a super-short post about the newest PL Edition!

Thanks for reading!

Friday, August 17, 2012

Project Life: The Month of July

Hello All!

I've decided to start posting my PL a month at a time.  That way, I can go over anything special that I do in a month once, and it doesn't get monotonous.  So here's July!

July 2-9, 2012:  A pretty colorful spread this week; we had an awesome 4th of July in Durham with Robbie's family.  Even though we spent a lot of our visit moving furniture, the food was delicious, and that kind of negates everything in my book.
The left hand side has our 4th of July lunch with family and us just hanging around with them, and my baby boy in the quad stroller (decorated with flags!) as they went through the daycare's parade.  I added the information for the picture directly on the photo in PhotoShop.  I took them to our local Children's Museum (the best way I've found for keeping them entertained when it's impossibly too hot outside to play) and included the receipt in one of the 3x4 pockets.  I used 2 journaling cards to talk about our activities on the 4th, so I used the same design, to give it some cohesiveness.
I had 1 8.5x11 insert; 2 pieces (back and front) of publication about Andy Griffith's passing.  He is a tremendous icon in North Carolina, and I personally have watched his show and movies since I was little.  I really liked the story our local paper wrote, because it highlighted a lot of his life and time in our state.
On the right hand page I cut a 4x6 photo in half for the 3x4 pockets (in the construction area at the Children's Museum).  I also tucked in the hand-flag Liam made at daycare to celebrate the 4th.  Another reason I love PL: I don't think I would have had a place to keep something like that before, without it being buried under projects that needed to be completed.
July 9-15, 2012:

A pretty quiet week for us...I did some more type on top of a photo in PhotoShop.  I added an Instagram (LOVE Instagram, you can follow me at l_jsmommy) cropped to 3.5"x3.5"on to a 4x6 journaling card.  Liam was using his daddy's screwdriver on his brother's toy cabinet-so cute!  Robbie teaching Liam how to use a multi-meter ('cause every 2 year old needs to know this, right?  But it was precious)
A picture of Liam sitting in a big boy seat for an ENTIRE dinner out, which is quite a big deal.  New shoe shopping for both boys.  I'm trying to remember to use the arrow stickers that I have, just because I love the color it adds.
July 16-22, 2012:

 A 6x12 insert of the pictures from the birthday party the boys were invited to Saturday.  It's a standard 12x12 photo pocket page I trimmed down.
 More pictures on the back with a copy of the invitation.
 An Instagram added to a 3x4 journaling card (picture cropped to 2.5x2.5) of the banner I made for the birthday party.
And more cute-ness from my family.  I'm making an effort to get pictures of myself included.  It's important mommies!
July 23-29, 2012:

I used a picture of the London Bridge I found on Google and added text to it via PhotoShop, just to talk about how much I really enjoy the Olympics.  I watched almost the entire Opening Ceremony that Friday night with Robbie; it was pretty awesome!  The top right photo is 2 pictures-in-1.  I added a 2.5x2.5 Instagram to a 3x4 journaling card + a 3x4 picture of a Pinterest-inspired piece of artwork my sister made for Jacob's room.  I glued both to a 4x6 journaling card.  (How cute is that whale?!)
Another 4x6 photo I cut in half to fit in (2) 3x4 spots.  (I have a problem deciding on only (7) 4x6 photos every week...I can't help it)  And a picture of our newly-framed in bathroom mirror in the almost-complete stage.  (I wrote a DIY tutorial here)

So that's it for July.  I hope it wasn't too many pictures and too wordy...but I think it'll work out better for me to post a month at a time, instead of trying to do this week-by-week.

Thanks for stopping by and visit again soon!

Monday, August 13, 2012

DIY Mirror Frame

This post has gotten a lot of traffic from Pinterest, and I really appreciate your visit to my blog!  I would love if you look around, add my blog to your favorites list and follow me!   You can connect with me here:

Pinterest: http://www.pinterest.com/thebakers2/
Twitter: @the_erinalana
Etsy: https://www.etsy.com/shop/NapTimeQuilting


Hello all!  A couple weekends ago Robbie and I decided to frame in our contractor-grade mirror slab in our master bathroom.  It is a huge mirror, but was very plain, with exposed clips holding it in, and just not very interesting.

I had been thinking about this project for awhile, and was surprised by how easy it ended up being-we started and finished it on a Sunday.  So here’s what we did:

We measured the mirror edges so we knew how much moulding we needed to buy.  At Lowe’s, we only had to decide which moulding we liked best.  I really wanted a different moulding on the bottom, that had a ledge to it, so I could put a starfish or something on it after we finished-sort of like a window frame.  And I knew I really wanted something decorative and large-because my mirror is so large, I felt like it needed something big enough so it wouldn't get lost.  SO, we ended up with a really cool fluted-kind of moulding around the top and sides (it was on sale too!), and a moulding with a nice ledge for the bottom of the mirror.

After we got the moulding home, I painted it with a bright white trim paint and let it dry in the sun.  The moulding came primed. :)  
While the paint was drying, we replaced 4 sets of bulky clips at the top with low-profile clips, since our plan was to glue the moulding to the mirror.  We went back and forth between gluing and nailing, but decided on gluing.

We used a general adhesive (DAP) that you put in a caulking gun (make sure it says for glass on the specifications) as well as a quick-dry/all purpose adhesive (GOOP) to hold the moulding while the first adhesive has time to dry and create a permanent bond (make sure it’s okay for glass also).

We measured the bottom of the mirror first, and cut the moulding at a 0-degree angle and applied the adhesives.  With the GOOP adhesive, you have to apply it to both surfaces you want to glue, and wait a few minutes before you join them together.  We taped the moulding up to make sure it didn’t move while it was drying.  If you need to, you can put something under the moulding, like a can of veggies or something that’s the right height, to keep it from sliding down while it’s drying.  If you give the GOOP the recommended dry time, you shouldn’t have a problem with slippage, but the weight of the moulding, humidity, etc. can affect all of that.

Next, measure your first side, and cut your moulding with the highest point of your 45-degree angle matching your measurement (so if the length you need is 30”, the highest part of your 45-degree angle will reach up to that 30” cut).  We used a compound miter saw, but you can also use a miter box.  We then measured the other side, cut at an opposite 45-degree angle, then measured the top and cut them with matching 45-degree angles.


We repeated the adhesive step, and let them dry for about 12 hours before we removed the tape.  The GOOP had a very strong smell, so it helps if you’re able to leave a window open to reduce the fumes.
Save your paint brush to touch up any small areas you find after the installation, and caulk (with a paintable mold-resistant caulk-if it’s for a bathroom) as needed.

Pretty satisfying results for a project that only takes a few hours of work and not a significant investment!

Thanks so much for visiting!

Wednesday, August 8, 2012

Catch-Up on Project Life

Hey everyone!  Sorry it's been a ridiculously long time since I've blogged, but I've had bunches going on, and I finished right when the Olympics began (I'm a HUGE Olympics fan) and then I had a bunch of home DIY stuff (which I'm writing posts for now)...so, I've just been super busy, but I'm back now!  AND I've even kept up with my Project Life!  Definite gold stars for me!  So I've put together a few pictures of the last few weeks, and I'll work on getting my current week and all my DIY projects posted soon!  Thanks for reading!


Here's the week that we took the boys to visit the Science Center in our area.  I included the map of the center as an 8.5x11 insert.

This is the weekend that we went to the beach with Robbie's family.  I had a bunch of stuff I wanted to include: my packing list (I'm slightly OCD and really enjoy making and crossing things off of a list)
For the date card, I used a photo of our suitcases almost packed, and just added the dates on top of the picture in PhotoShop.

Here's my super-detailed packing list; I put the list in an 8.5x11 page protector, stitched up the side and trimmed it.
This is a 6x12 insert that will hold 6 photos.  These were all beach-themed, so I put a little self-adhesive Avery tab on the edge that identifies the pictures.  I got this idea from Ali Edwards.

This shot is the back of my packing list; I included the Rx for my son's medication that we picked up after the trip as well as the family picture that was taken at the aquarium we visited.

This was the week I traveled to Massachusetts to help my mom get my grandmother's house ready for Closing.  We visited the cemetery where both of my grandparents are buried.  The insert is a cut down, stitched and trimmed 8.5x11 that holds 2 pictures from the visit, and text about the trip (below).  I chose to add this, because it was much more verbose than anything that would fit on the 3x4 journaling cards.  It was an emotionally tough trip, but I was glad I was able to go and help my mom.


And on to a happier note, this was Father's Day week, and I included the cards that the boys made for Robbie at daycare.  For these inserts, I used a 12x12 page protector, and stitched and trimmed, much the same as the 8.5x11 inserts.
Thanks a bunch for stopping by, and I have a lot of cool posts to come, so check back soon!

Tuesday, June 26, 2012

A Farm-Themed Little Boy's Birthday Party


This post has gotten a lot of traffic from Pinterest, and I really appreciate your visit to my blog!  I would love if you look around, add my blog to your favorites list and follow me!   You can connect with me here:

Pinterest: http://www.pinterest.com/thebakers2/
Twitter: @the_erinalana
Etsy: https://www.etsy.com/shop/NapTimeQuilting
Sorry it's been so long since I've posted; there's a lot of exciting things going on -lots of everyday, life stuff- and I'm working on making more time for my blog.  I'm covering all of the family and friends stuff pretty well, and that's what's most important to me, so forgive my sporadic postings-I'm trying to do better!  So anyhoo, on to the post!

A friend of mine's son is getting ready to celebrate his first birthday, and I'm helping with some decoration ideas and the invitations.  All of the prep work made me think about my Liam's second birthday party this February...is there anything more exciting that planning for your kid's birthday party?!  I think not!  I had no idea birthday parties could be so much fun, until I had my 2 boys.
So, I thought I'd share some pictures with you from Liam's Farm-Themed party.


My wonderful husband and mother-in-law stayed up with me the night before the party to put together all of the decorations we'd be taking to the Children's Museum that hosted the party (a Children's Museum is a FANTASTIC place to hold a party; ours gave us a room and a party 'helper' and the guests and their kids got to play the whole day after the party!  Plus, I didn't have to clean up my house!)

I had been writing down ideas for this party in a notebook I keep in my purse.  I spent a lot of time thinking about cool party favors, and settled on goldfish shaped like carrots (what kid doesn't like goldfish?!) and a brown paper bag with animal stickers and bubbles.


For the goldfish-carrots, I used Wilton cake decorating bags from Wal-Mart and filled them about 2/3 of the way full.  Then I took green ric-rac to tie them off.  I took an oval-shaped galvanized bucket I got from Lowe's, filled the bottom with scrunched up newspaper, and added craft-colored paper shreds to the top.  I nestled the 'carrots' in so it would look like a harvest.  The bags did have a purple Wilton logo printed on one side of the bag, so I just turned them towards the back of the bucket.  I did the carrots on one side of the bucket and the brown bags on the other.  I printed out name labels for each kid in a primary color and put them on the bag.


The other decoration-prep that I did was very involved and slightly ill-fated...I took 4 yellow sheetrock putty containers (from Lowes), filled them with Seed-Starter dirt, and planted grass seed in each of them.  They set on my front porch rails to get as much sun as possible during the day, and I brought them in every night so they wouldn't get too chilly (this is February we're talking about).  This may have worked...if I hadn't left this step to only 2 weeks before the party.  I finally admitted that the grass wasn't going to grow, and I went to our Farmer's Market where there's a sod producer.  I bought a piece of sod and cut out 4 rectangles to fit in my putty containers.  It wasn't the golf-course grass I had envisioned, but after some trimming, it looked pretty good.  
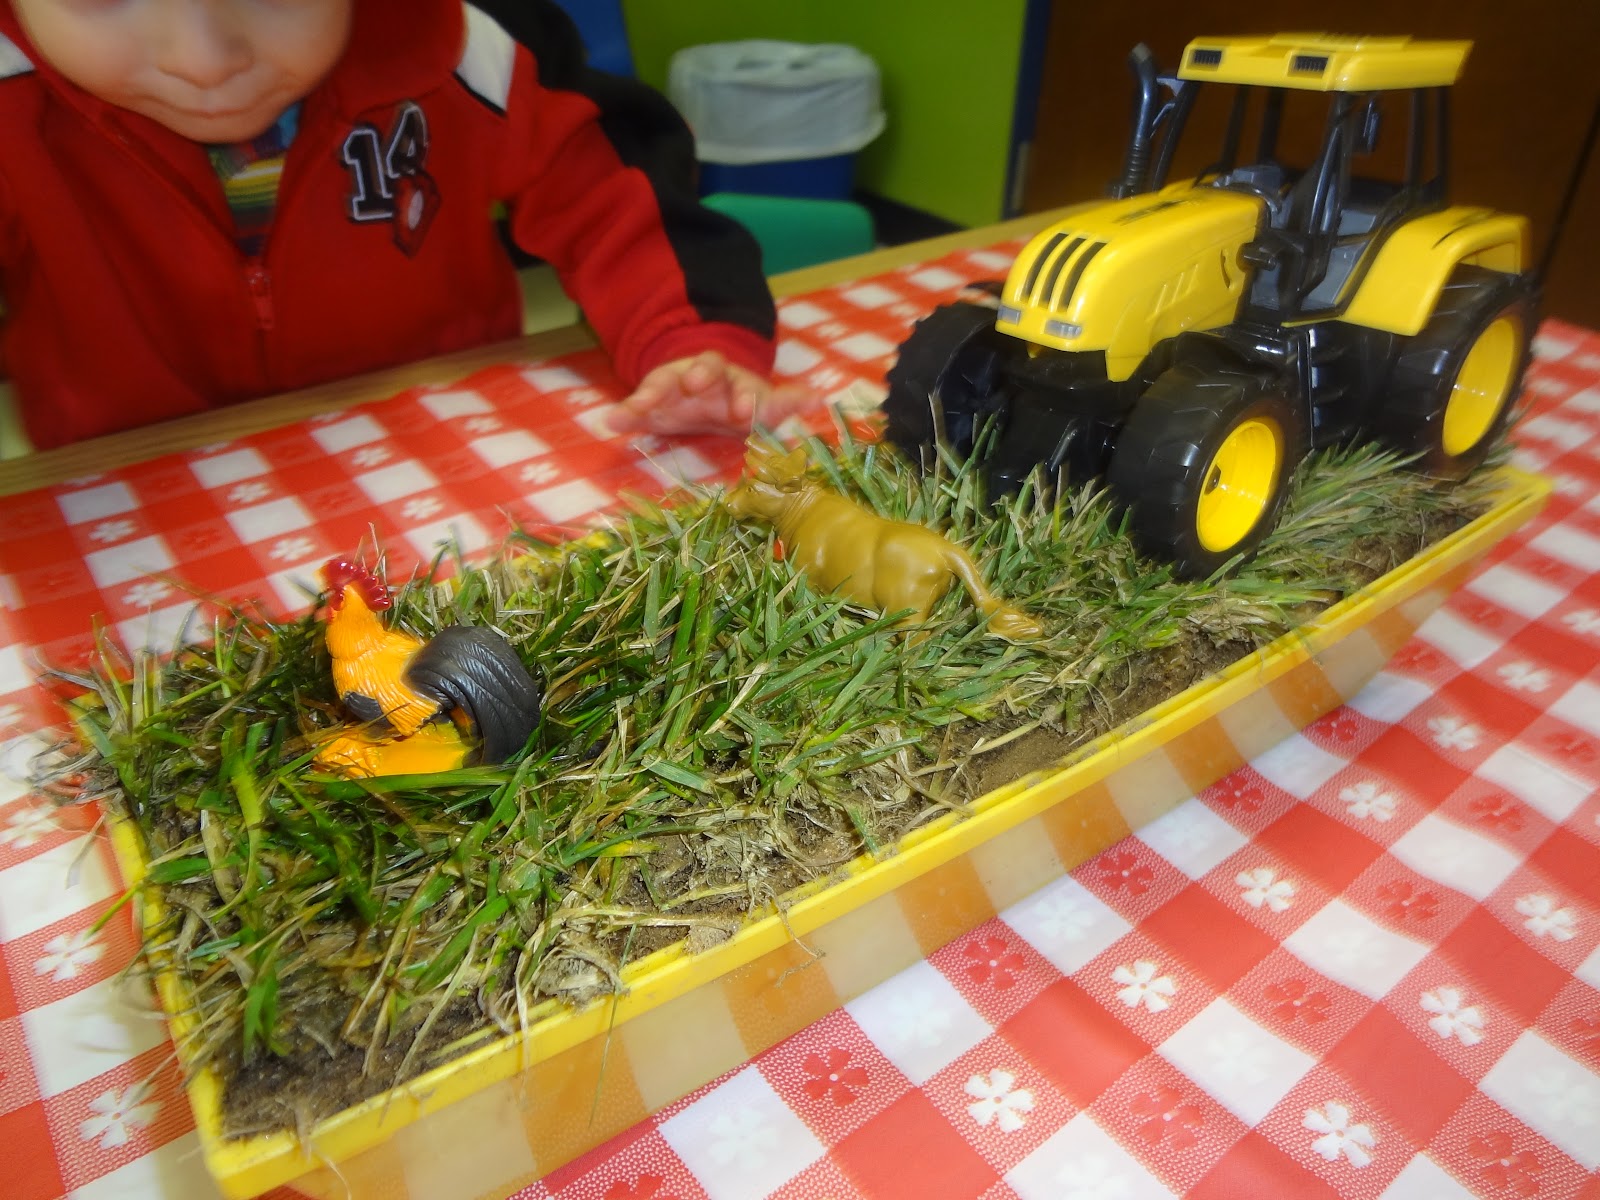
I put some toy tractors and animals in the grass, and those were part of the centerpieces.


Last decoration: round galvanized buckets (yep, from Lowes) filled with florist foam (to hold the dowels) and craft paper shreds. I printed out a #2 on a star and glued them back to back and some paper animals (glued back-to-back also) on dowels.  I wrapped a red grosgrain ribbon around each bucket and a white piece of ric rac on top of that.  I set each bucket on a wood 'disc' that Robbie cut for me from one of the many pines we've cut down in the backyard.  I thought it helped give the bucket a little height and texture and set it apart from everything else setting directly on the tablecloth.


Everything was set on red and white checkered table cloths (I had no idea it would be so difficult to find these!  Maybe it's because we were looking for them in February, and they're more of a Summer item...we ended up having to buy a camping packet from Target that came with 2 table cloths and table clips for really camping-now I know!).

I got so many compliments on the decorations-even the party 'helper' was impressed; she said everything looked so original and not many people made their own decorations-and I imagine she's seen a lot of parties in her day.


My birthday boy playing with the farm animals in the centerpiece, while we set up.

Everything else was perfect-we got McNuggets, mandarine oranges and apple juice boxes (all of Liam's favorites) and cupcakes.  The kids had a great time playing, and hopefully took good naps for their parents when they got home!  Liam and Jacob had a blast playing and seeing their friends, and really, that's what it's all about-the decorating fun is just extra.


 A view of the table, all set up and ready for hungry kids!


 Liam blowing out his candle.

My sweetheart, proudly showing off that he's 2 years old.

Good luck in your birthday-party-planning-adventures and thanks for visiting!